Pragmatic Bare Metal Rust
If you’re confused with the metallurgically-sounding title: this is about embedded software development with a nifty new computer language called Rust. We’ll look into how to get a C-bootstrapped Rust firmware with dynamic memory allocation and use a Rust written command line prompt library, all on a bare metal (no operating system) ARM development board.
STM32 ARM development environment
32 bit ARM chip computers are available from dozens of manufacturers, my pick was ST. Choosing a vendor also usually means using their driver library, at least if you don’t want to spend many hours looking at specifications and bit banging various registers. Let’s say that ST’s support libraries are… sufficient.
Lots of register definitions and various toggles are implemented as macros, so Rust’s FFI support can’t directly use the peripheral library. We’ll be writing our own C functions as an additional hardware abstraction layer which will utilize those macros and functions from ST’s library. This was also my primary reason to bootstrap the firmware in C and later transition the main loop into Rust land - hence the “pragmatic” in the title. The Zinc project is going at it with the 100% Rust only approach.
It should be noted that free software toolchains for embedded development are relatively limited when compared to commercial offerings (Keil MDK, TrueSTUDIO, …), but we’re approaching this project from a hobbyist’s perspective. We don’t have a few thousand bucks to spend.
My environment for this example is Eclipse with the GNU ARM plugin with the GNU ARM GCC compiler. The STM32 system and peripheral initialization project code was generated with STM32CubeMX and manually imported into Eclipse’s build system. It’s certainly a learning experience to set up everything manually, from understanding the basics of computers to linking scripts and pesky compiler options. Be sure to enable the option to generate ARM Thumb interwork, omitting it can lead to a non-responding system on startup. The GNU ARM plugin has an excellent tutorial with a built-in template for the most basic debuggable project - the development board LED blinker. You’ll be oddly relieved once you’re able to step into the LED toggle methods…
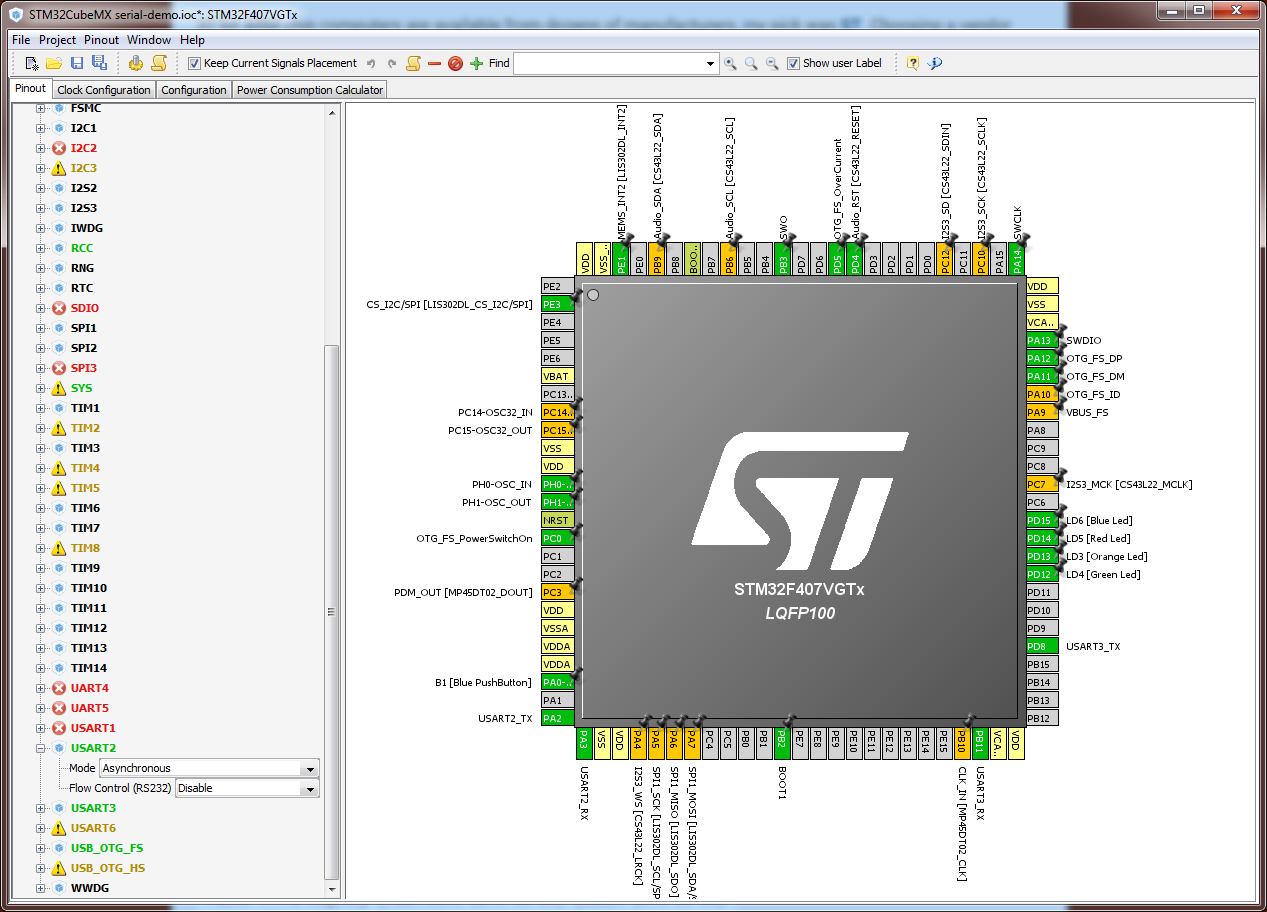
CubeMX provides all the required initialization code, from system clocks to interrupts, pin assignment, UART devices and more. It also generates a nifty pinout in case you forget where you need to connect what.
Since we want to use dynamic memory, we also need to provide some additional methods to handle heap allocation, most notably the sbrk function. Nanolib’s stub files are a good starting point. Here’s the one from our demo project. It’s advised to test if memory allocation and basic I/O work fine on your actual hardware with simple C code (malloc, print the pointer’s address to serial output) before adding Rust to the mix.
Rust on embedded, with dynamic memory allocation
Our project requires a 1.1 nightly build of Rust, as 1.0 doesn’t support the unstable language features that we’ll need. First we need to cross compile the core Rust libraries for our target architecture. The build has to exactly match the snapshot of the compiler that you’re using. The version commands tells you the Git hash of the build:
rustc --version
rustc 1.1.0-nightly (7bd71637c 2015-05-06) (built 2015-05-06)
Clone the Rust repository and checkout the appropriate snapshot. For ARM development, we’ll use this Rust platform target file (Rust’s target docs), place the file into the root of the compiler and issue these commands to compile the core libraries:
rustc -C opt-level=2 -Z no-landing-pads --target thumbv7m-none-eabi -g src/libcore/lib.rs --out-dir libs-arm --emit obj,link
rustc --cfg feature="external_funcs" -C opt-level=2 -Z no-landing-pads --target thumbv7m-none-eabi -g src/liballoc/lib.rs --out-dir libs-arm -L libs-arm --emit obj,link
rustc -C opt-level=2 -Z no-landing-pads --target thumbv7m-none-eabi -g src/librustc_unicode/lib.rs --out-dir libs-arm -L libs-arm --emit obj,link
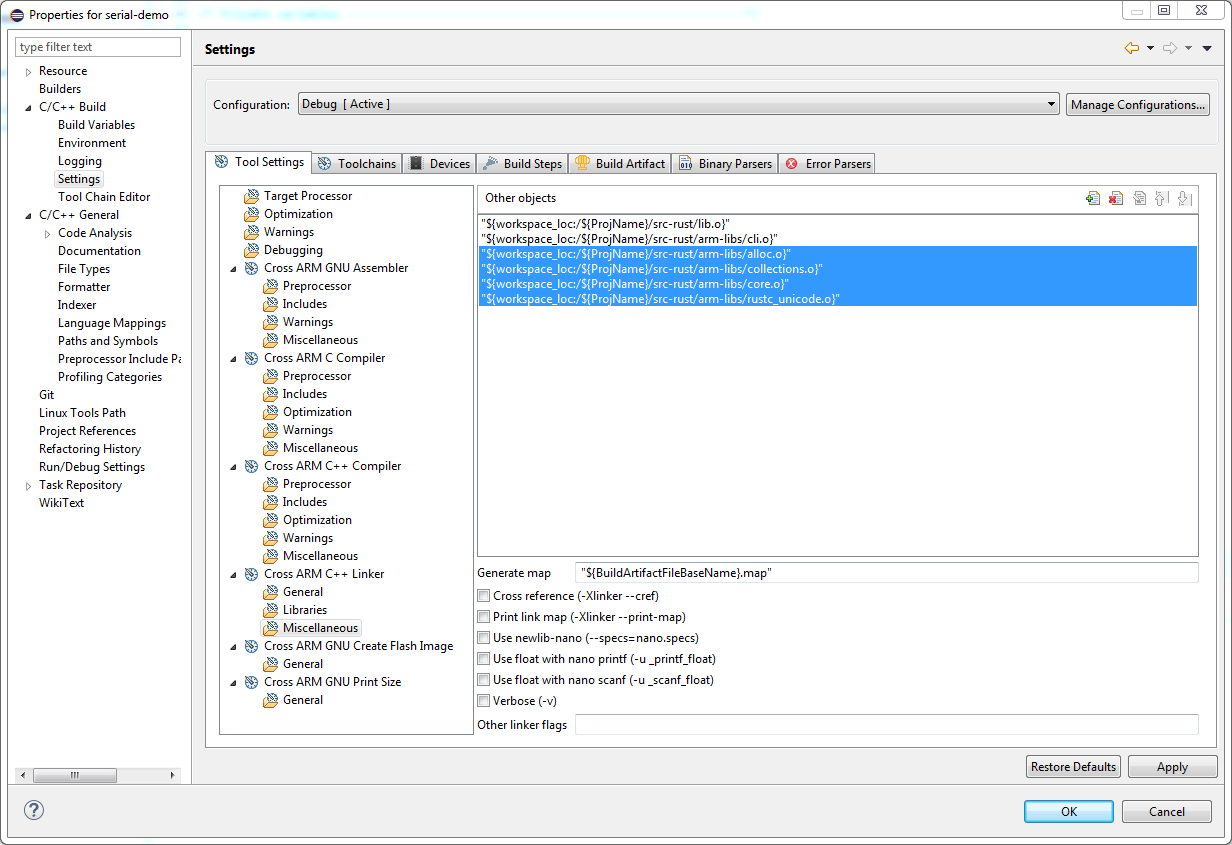
rustc -C opt-level=2 -Z no-landing-pads --target thumbv7m-none-eabi -g src/libcollections/lib.rs --out-dir libs-arm -L libs-arm --emit obj,linkThe libs-arm directory should now contain a bunch of libraries, in Rust’s library format .rlib and a linker version as a classic .o object file. You’ll need to use the Rust versions of these for each Rust compilation you’ll invoke for your final firmware. The object files are only required at the final assembly of the binary. We’ll add them under the “Other objects” section of the GNU ARM linker options.
Rust’s standalone environment requires a few panic and stack handling functions (based on this excellent blog post - which gave me the confidence that this whole thing is doable), our demo project implements them in this file. Additional methods are required to get Rust’s memory allocator up and running. We’ll be simply calling the nanolib’s implementation that ships with GCC ARM.
Note that the current design of Rust’s collections library (which we are using in an unstable, 1.1 nightly way) doesn’t support graceful handling of out of memory situations, so allocating a large string or vector could lead to the runtime calling the abort function.
The ubiquitous serial terminal
A step up from the classic “Hello world” of embedded projects - a blinking LED - is a command prompt on a serial interface. Since we’d like to have a feature rich bash-like shell with autocomplete support, a nice high-level language with safe string handling functions is a great upgrade over C. Rust!
Presenting terminal_cli.rs (documentation), a library that does exactly that. It is written with the libraries that don’t require any threading support (the no_std Rust language feature) and compiles from the same source code on both OS and bare metal environments. Cargo runs tests in a fully featured OS environment, with the std library so it’s incredibly easy to develop a new feature and have it fully tested before you even flash it into your development board.
To compile it, you’ll need the .rlib libraries that we’ve compiled before. Place them in the appropriate directory (here its libs-arm) and pass that info to the compiler. You’ll also need the platform JSON file.
rustc -C opt-level=2 -Z no-landing-pads --target thumbv7m-none-eabi -g --crate-type lib -L libs-arm --crate-name cli src/lib.rs --emit obj,link
This should produce the files libcli.rlib and cli.o. They are ready for further usage in a Rust library (first one) and for final linking (the second one).
You can read more about the library on its documentation page, but here’s a little sample of you can add a self owned property that can be altered from the command line.
let some_int = CliPropertyVar {
    var_name: "some_int".to_string(),
    val_hint: "positive integer".to_string(),
    var_value: 100,
    var_output: |v| {
        v.to_string()
    }
    var_input: |v| {
        let n = v.parse::<i32>().ok();
        match n {
            Some(n) if n >= 0 => Some(n),
            _ => None
        }
    }
};
cmds.push(Box::new(some_int) as Box<CliCommand>);
Demonstration project on hardware
So let’s put the whole shebang together. The demonstration platform is a STM32 F4 Discovery development board, available for around $25. A simple USB serial interface is connected to pins PA2 (transmit) and PA3 (receive). The port’s settings are 115200, 8 bits, no parity, 1 stop bit. The four LEDs near the main processor can be toggled from our command line interface.
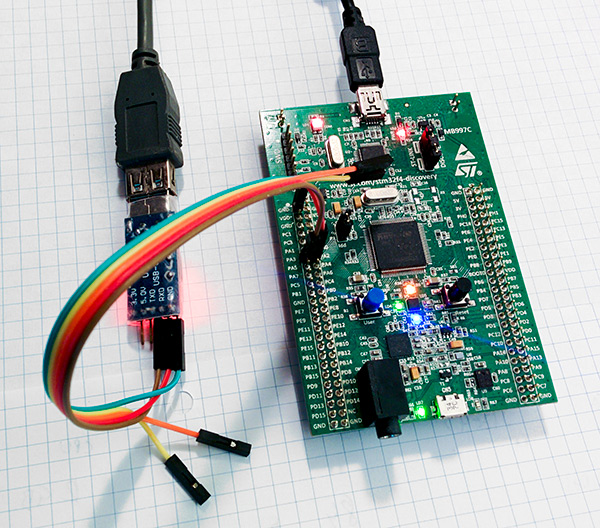
If you have this development board and have a serial interface available, you can download the precompiled firmware binary and flash it on your own board. But still, here’s a little preview of the functionality. Note that all receive buffer management (backspaces, double tab auto complete, prompt display) is provided by the CLI library.
Check the main loop written in Rust and its accompanying files for hardware and runtime support. Also compare the hardware interaction functions that are called from Rust into C: the C side that does the actual work and Rust’s FFI interface to the hardware methods.
The todo list
For me, this setup greatly eases my first experiments with embedded development. Core libraries can be implemented and unit tested on a personal computer, then simply cross compiled with the exact same compiler for the target hardware. I’ve spent much more time tinkering with hardware interaction code than the Rust-developed core libraries.
Absolutely no optimization whatsoever has been performed. Not in the performance nor memory (runtime or program size) domain. Many things are heap allocated where embedded developers would probably prefer stack allocation for lesser memory fragmentation. Consider this a proof of concept for now.
The demo target hardware is very generous with memory and storage, at least in the embedded world - 192KB of RAM and 1MB of flash storage. A 75KB command line demo is indeed very large for what it is, but I don’t know yet how space usage climbs with program size. But richer abstractions might provide better space savings with code reuse.
Unfortunately I couldn’t get the USB serial port implementation in the F4 Discovery working, it would be much easier to demonstrate this project with just a USB micro connection instead of required a dedicated serial port interface and jumper wires.
I also haven’t looked into hooking up the Rust debugger into Eclipse for on-hardware debugging, but it should be doable.
It should be possible to wrap Rust code into a C-based RTOS such as FreeRTOS.
The CLI library is more or less a proof of concept at the moment, I’m sure that some real world exposure would help with the roadmap. An ambitious step would be to add a VT100 terminal interface to support things like prompt history.
All the Rust core library builds and further output options could be ported to Cargo (Rust’s package manager), which should greatly simplify setup time for new projects. Cargo is resisting the option to add support for specifying arbitrary compiler options, but it does support custom build scripts. Haven’t looked that much into it for now as this project was small and experimental.
In case you have habitually scrolled to the bottom of the article, here are some Github links for you: the CLI library and the F4 demo project.